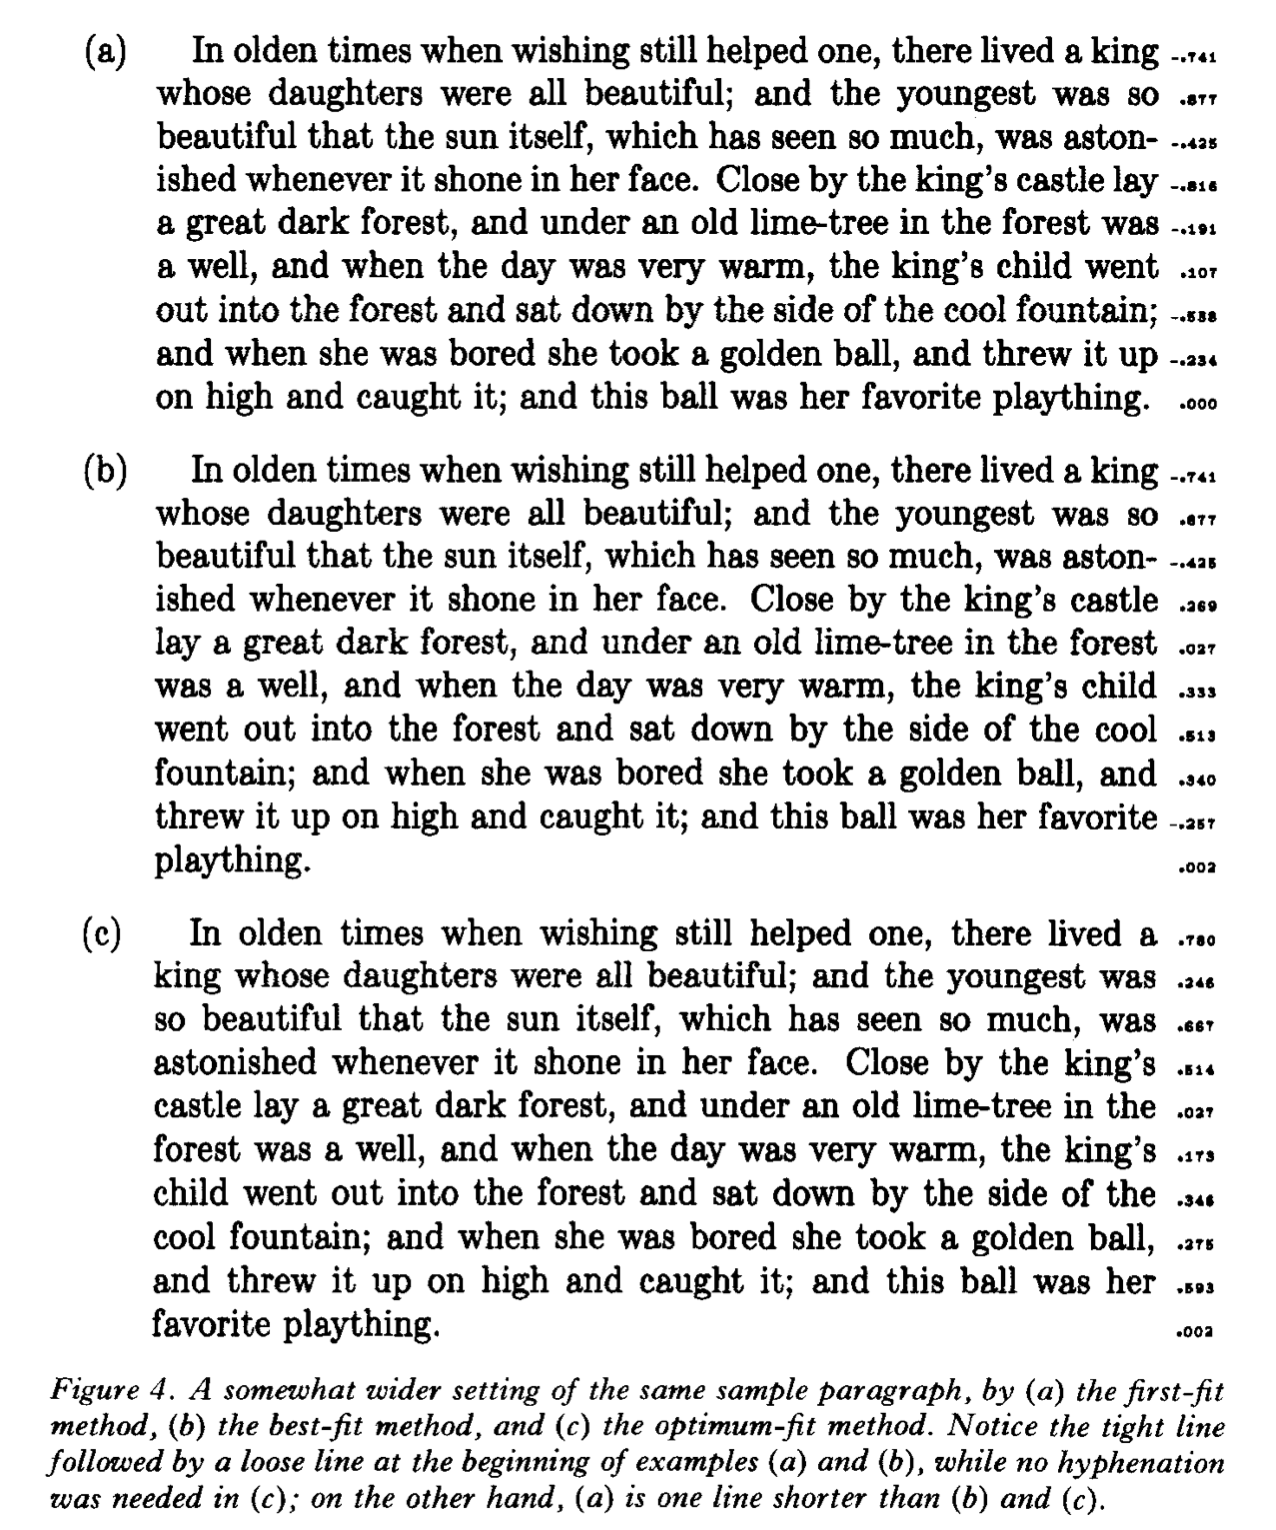
I am an architect (the physical kind), not a programmer, and I am interested in Typesetting and fonts. The common wisdom online is that Knuth's linebreaking algorithm, implemented for TeX some time back, is the be all end all way to typeset text on a printed page. But there are no clear explanations of what the algorithm is, beyond handwavey explanations of boxes and glue and penalties. I, being a lemming, strove to understand the algorithm, and I believe I can explain it succinctly. I promise not to use the phrase "Dynamic Programming".
Here is Donald Knuth and Michael Plass's 1981 paper. It is more thorough and rigorous than what I am writing here. Here is another article explaining the algorithm in a different manner.
For the rest of this article I will assume paragraphs are in one language and one script, so no bi-directional text complications. There is also no discussion of TeX's other features because this is not about TeX.

Input
The Text
The most important input is the text. However, the algorithm does not deal with the raw encoded text. You need to process your text to extract boxes, glue, and breakpoints.
The first process is called "Shaping". The shaper (the most famous of which is HarfBuzz), takes the input text and the font you want to use and gives you three things: what glyphs (from the font) to use, their order, and their positioning (think kerning). In other words, it gives you a series of boxes. The linebreaking algorithm does not care what is inside the box. It only cares about the box's "width", or the horizontal advance.
The shaper also tells you that which characters from your text are whitespace, and be stretched and squashed as needed. The space is the most famous of those, but there are others. These are called glue. Each glue character has a default width, a minimum width, and a maximum width. (The paper expresses the minimum and maximum as ratios, and I do not quite understand that specific part to be honest as it is mathier than what I know.) In practical terms, this says that the space can't be so small that words are glued together, and it can't be so large that most of the line becomes whitespace. These values can be based on the font or the script or the designer or whoever. The minimum could even be zero should the designer wishes.
Also, you need to run your input text through a breakpoint-finding algorithm. This is to say, you need to know where you can break your text into lines. You can't just break the line arbitrarily anywhere, or only at glue (think hyphenation). The Unicode ICU library has the tools for that.
Knuth's name for breakpoints is penalties, and that includes mandatory breakpoints, such as the end of paragraphs, and undesirable breakpoints, such as hyphenated words. In Knuth's implementation, penalties have a width. Usually it is zero, but when you break at a hyphen, you need to add the hyphen's width. If you want to implement trailing punctuation (a rather nifty typographic trick), you give the penalty after the punctuation a negative width. Look at the paper for more detail.
Note that boxes having a fixed width is a rather hefty assumption. It only works for Latin typesetting, and only works for fixed fonts. In other scripts, characters may have alternate shapes that may be wider or narrower. There is even an OpenType feature for that, called Justification Alternates. Many variable fonts have axis that only control specific letters. See an Arabic and Latin example and an Armenian one. The Knuth-Plass algorithm as usually implemented does not know how to deal with either of these features, and because Latin-centric software designers, we Arabic speakers are stuck with ugly justified text. But I am coming to that later.
Back on track: you get your text. You run through the shaper, and the Unicode ICU library, and you get two lists.
- A list of glyphs, expressed as fixed width boxes (letters), and stretchable, squashable glue (white space).
- A list of breakpoints, places you can break the line. They have an associated value called penalties which ranges from -100,000 (never break here) to +100,000 (must break).
The Line Width
Self explanatory really. You have a specific line width you want to justify your text into. Or even a series of line widths for text (say for text typeset in a circle).
The Algorithm
Description
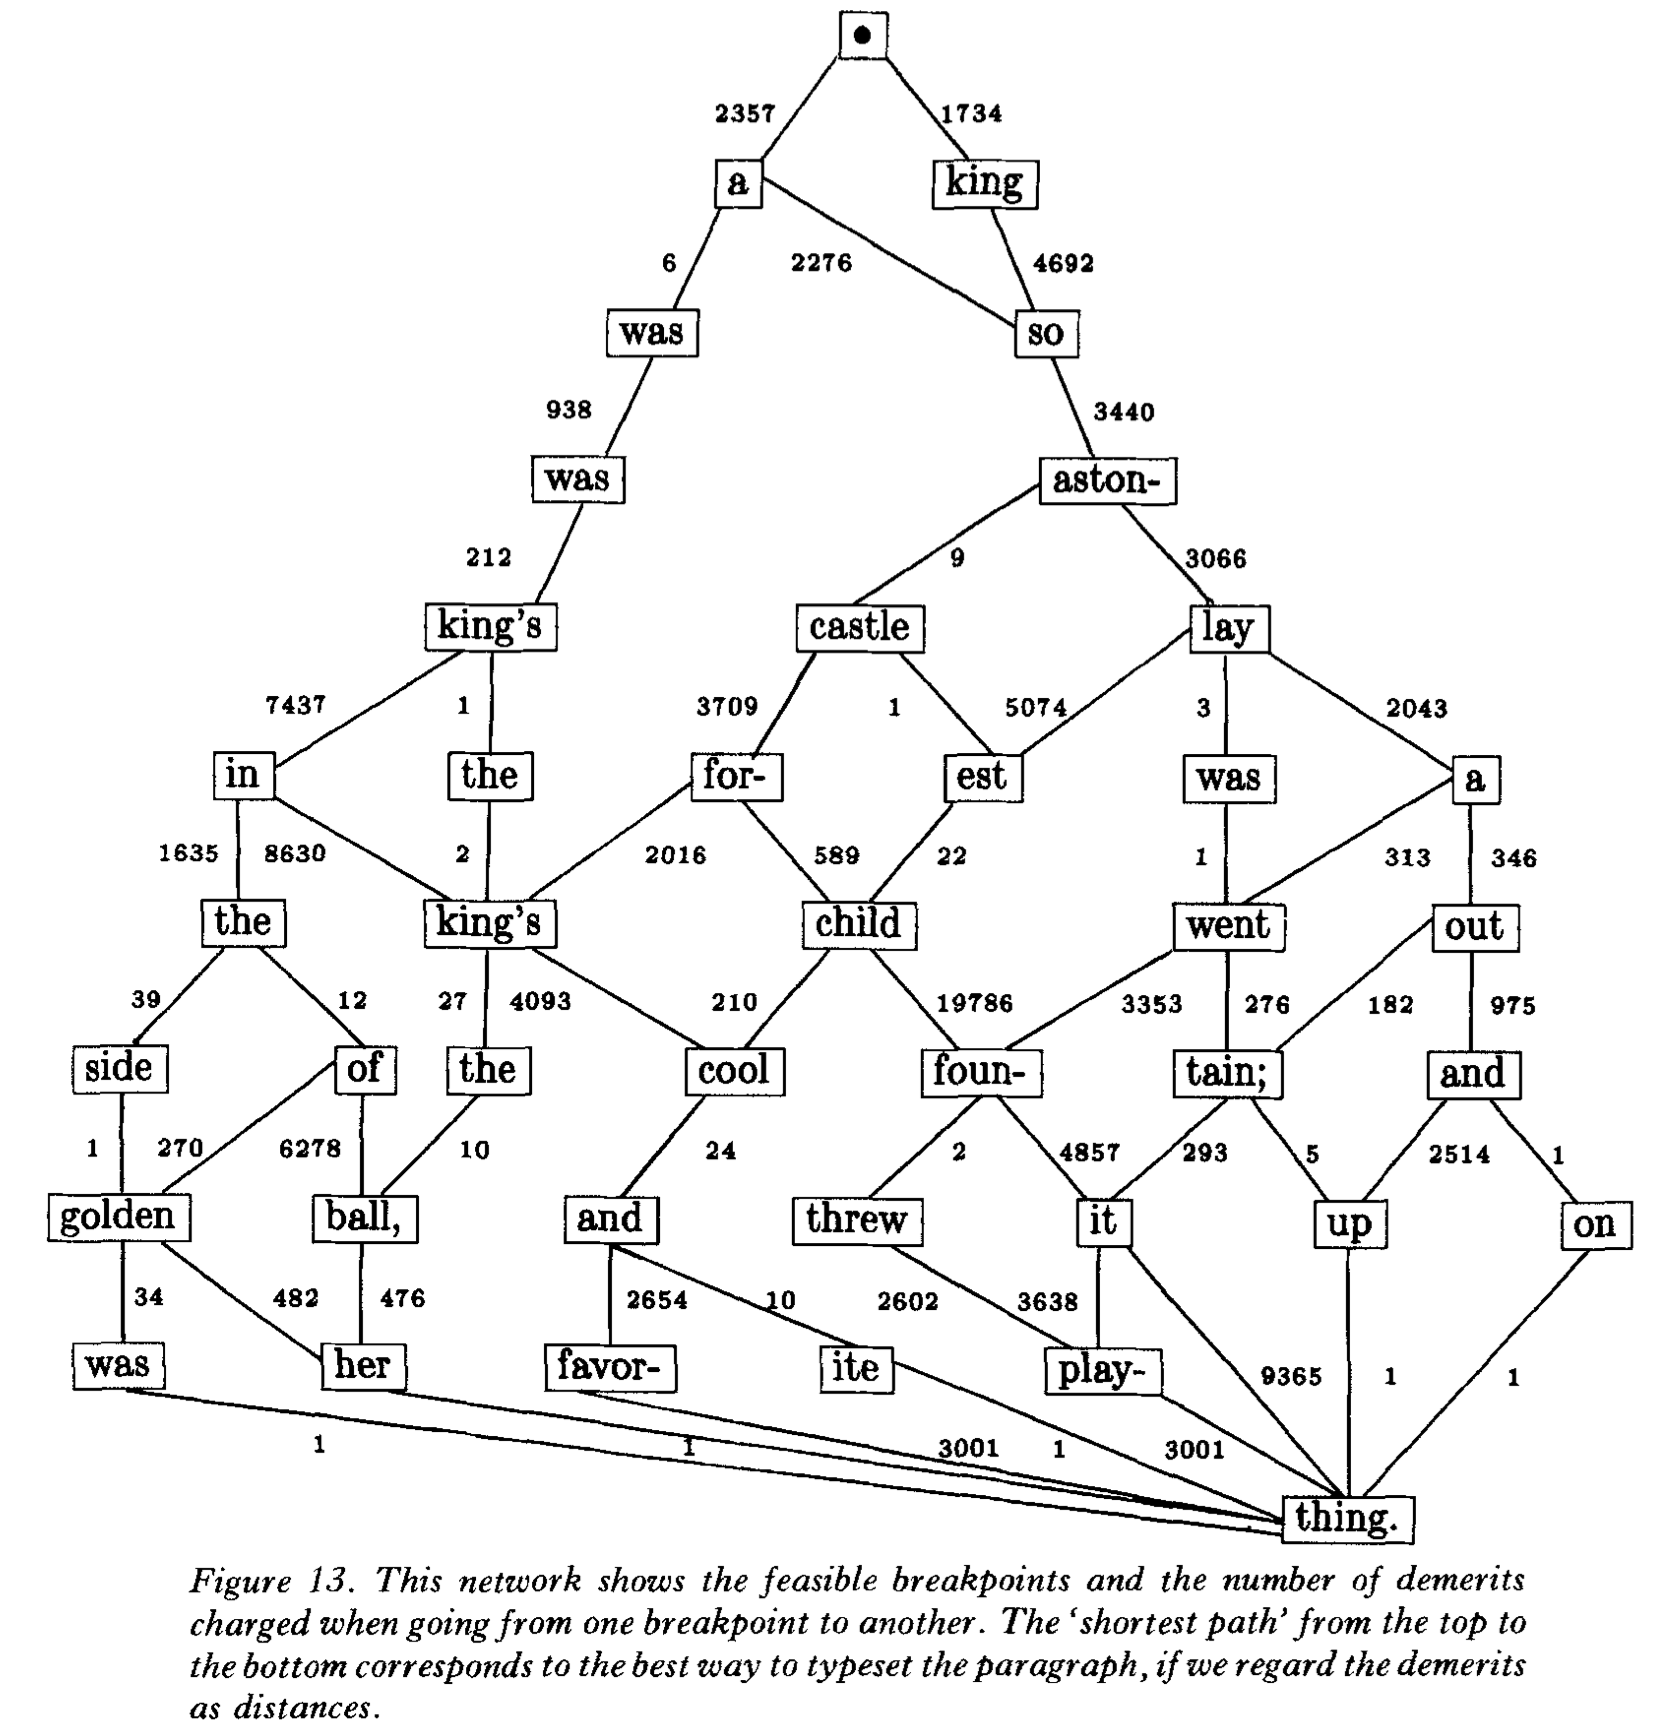
This beautiful graph from the Knuth-Plass paper (linked in the intro) explains the central idea of the algorithm fairly well. Seeing it in the paper was a Eureka moment for me.

This is a directed graph from the beginning of the paragraph to the end, where the breakpoint is mandatory. The graph's nodes are the breakpoints. The edges are the lines typeset between said breakpoint. The edge's cost, the little number next to it, is the "ugliness" of the line, as it were: an evenly spaced line as the font designer intended where the distance from the beginning to the end is exactly the given line width, would have zero cost. The cost's formula is easily findable online, adjusted by the last breakpoint's penalty. (For example, a break at a hyphen would give a penalty of, say, -50).
The example given is fairly simple: the boxes are the letters; the glue is the spaces; and the breakpoints are where the spaces are in addition to any hyphenation opportunities.
Here are the rough outline of how to build the graph:
- Start from the beginning. This is your root node.
- Identify the first following breakpoint where the line is as loose as possible. (i.e. the glue is as stretched as can be).
- Identify the last following breakpoint where the line is as tight as possible. (i.e. the glue is as squished as can be).
- Add the breakpoints identified in steps 2 and 3, and every breakpoint in between, as children for the node in step 1. The edge cost between the parent node and each child is based on the line formation.
- For each child node, repeat the process.
- After all nodes and edges have been found and calculated, pick the path from the beginning to the end with the least cost. (I think this is called the Dijkstra algorithm? It is in every graph library.)
Often, the last line, or edge, of the directed graph always has a cost of 0. In physical terms, the last line of the paragraph is not usually justified, so wherever the last word falls is fine and the spaces will be added evenly.
The penalties attached to breakpoints can change the evaluation of each line's cost. The simplest example is hyphenation. A breakpoint at a hyphen, having a penalty of -50 (or w/e), adds 50 points to the cost. Two hyphens in a row adds, say, 100 to the cost of both hyphens (so it is especially discouraged.) To avoid typographic orphans, the second to last and third to last breakpoints can be assigned arbitrary large penalties. Another idea suggested in the paper is to give a penalty to lines with wildly different densities (so a tight line followed by a loose line). The penalties attached to breakpoints give you a flexible toolbox to decide which typographic "behaviour" to encourage or discourage.
Note that these numbers for penalties are essentially arbitrary and you should try different values for different things. You can even have the user set them!
Another thing of note is that sometimes a node can have more than one parent. In fact for the last breakpoint in the paragraph this is mandatory! So when you are building the graph, you might want to check if the child node you found is already recorded, and simply extend a new edge to it.
Pseudocode
Here is some pseudorustcode showcasing the idea (as I am currently learning Rust):
use made_up_graph_library;

fn line_break (input: ShapedText, width: f64) -> Vec<Line> {
    let bps = input.breakpoints();

    // paragraph start
    let graph = Graph::new();
    graph.add_node(bps[0], AsRoot);

    for i in 0..bps.len() {

        // if no node exists for this breakpoint, continue,
        // since nodes are created by the inner loop below.
        if !graph.contains_node(bps[i]) {
            continue;
        }

        for j in (i + 1)..bps.len() {

            // a build_line() function that takes
            // ShapedText, indices of start and end,
            // and a desired line width, and returns
            // Result<Line, Error>.
            //
            // Each Line has a cost property.
            let attempt = build_line(input, i, j, width);
            match attempt {
                // if line is too loose skip to the next
                // iteration of the inner loop
                Error::LineTooLoose => continue;

                // if line is too tight, break the inner loop
                Error::LineTooTight => break;

                // if line is buildable :
                Ok(line) => {
                    // if the bps[j] node was created in a
                    // previous iteration, update it
                    if graph.contains(bps[j]) {
                        graph.add_edge(parent: bps[i],
                                       child: bps[j],
                                       edge: line);
                    // and if it wasn't, create it.
                    } else {
                        graph.add_node(bps[j],
                                       AsChild(parent: bps[i],
                                               edge: line));
                    }
                }
            }
        }
    }

    // bunch of imagined methods where the graph library gives me
    // the shortest path from a given start to a given end, then
    // returns a vector of the edges passed.
    let output = graph.shortest_path(from: bps[0],
                                     to: bps[bps.len() - 1],
                                     eval: |line| line.cost)
                      .edges()
                      .collect();

    output
}
That's it. This is the Knuth-Plass linebreaking algorithm, more or less.
Adjustments
Note that now there is no logic to punish two consecutive hyphenations and paragraph lengths and other cost adjustments related to the paragraph as a whole. One could add these adjustments after creating the graph, by traversing the graph and adjusting the cost of any edge between two hyphens, or any sequence of edges with disparate density, and what have you. The sky is the limit.
Real world example: Typst
From the little code examples I have seen, the algorithm is implemented slightly differently. Here is a real world example:
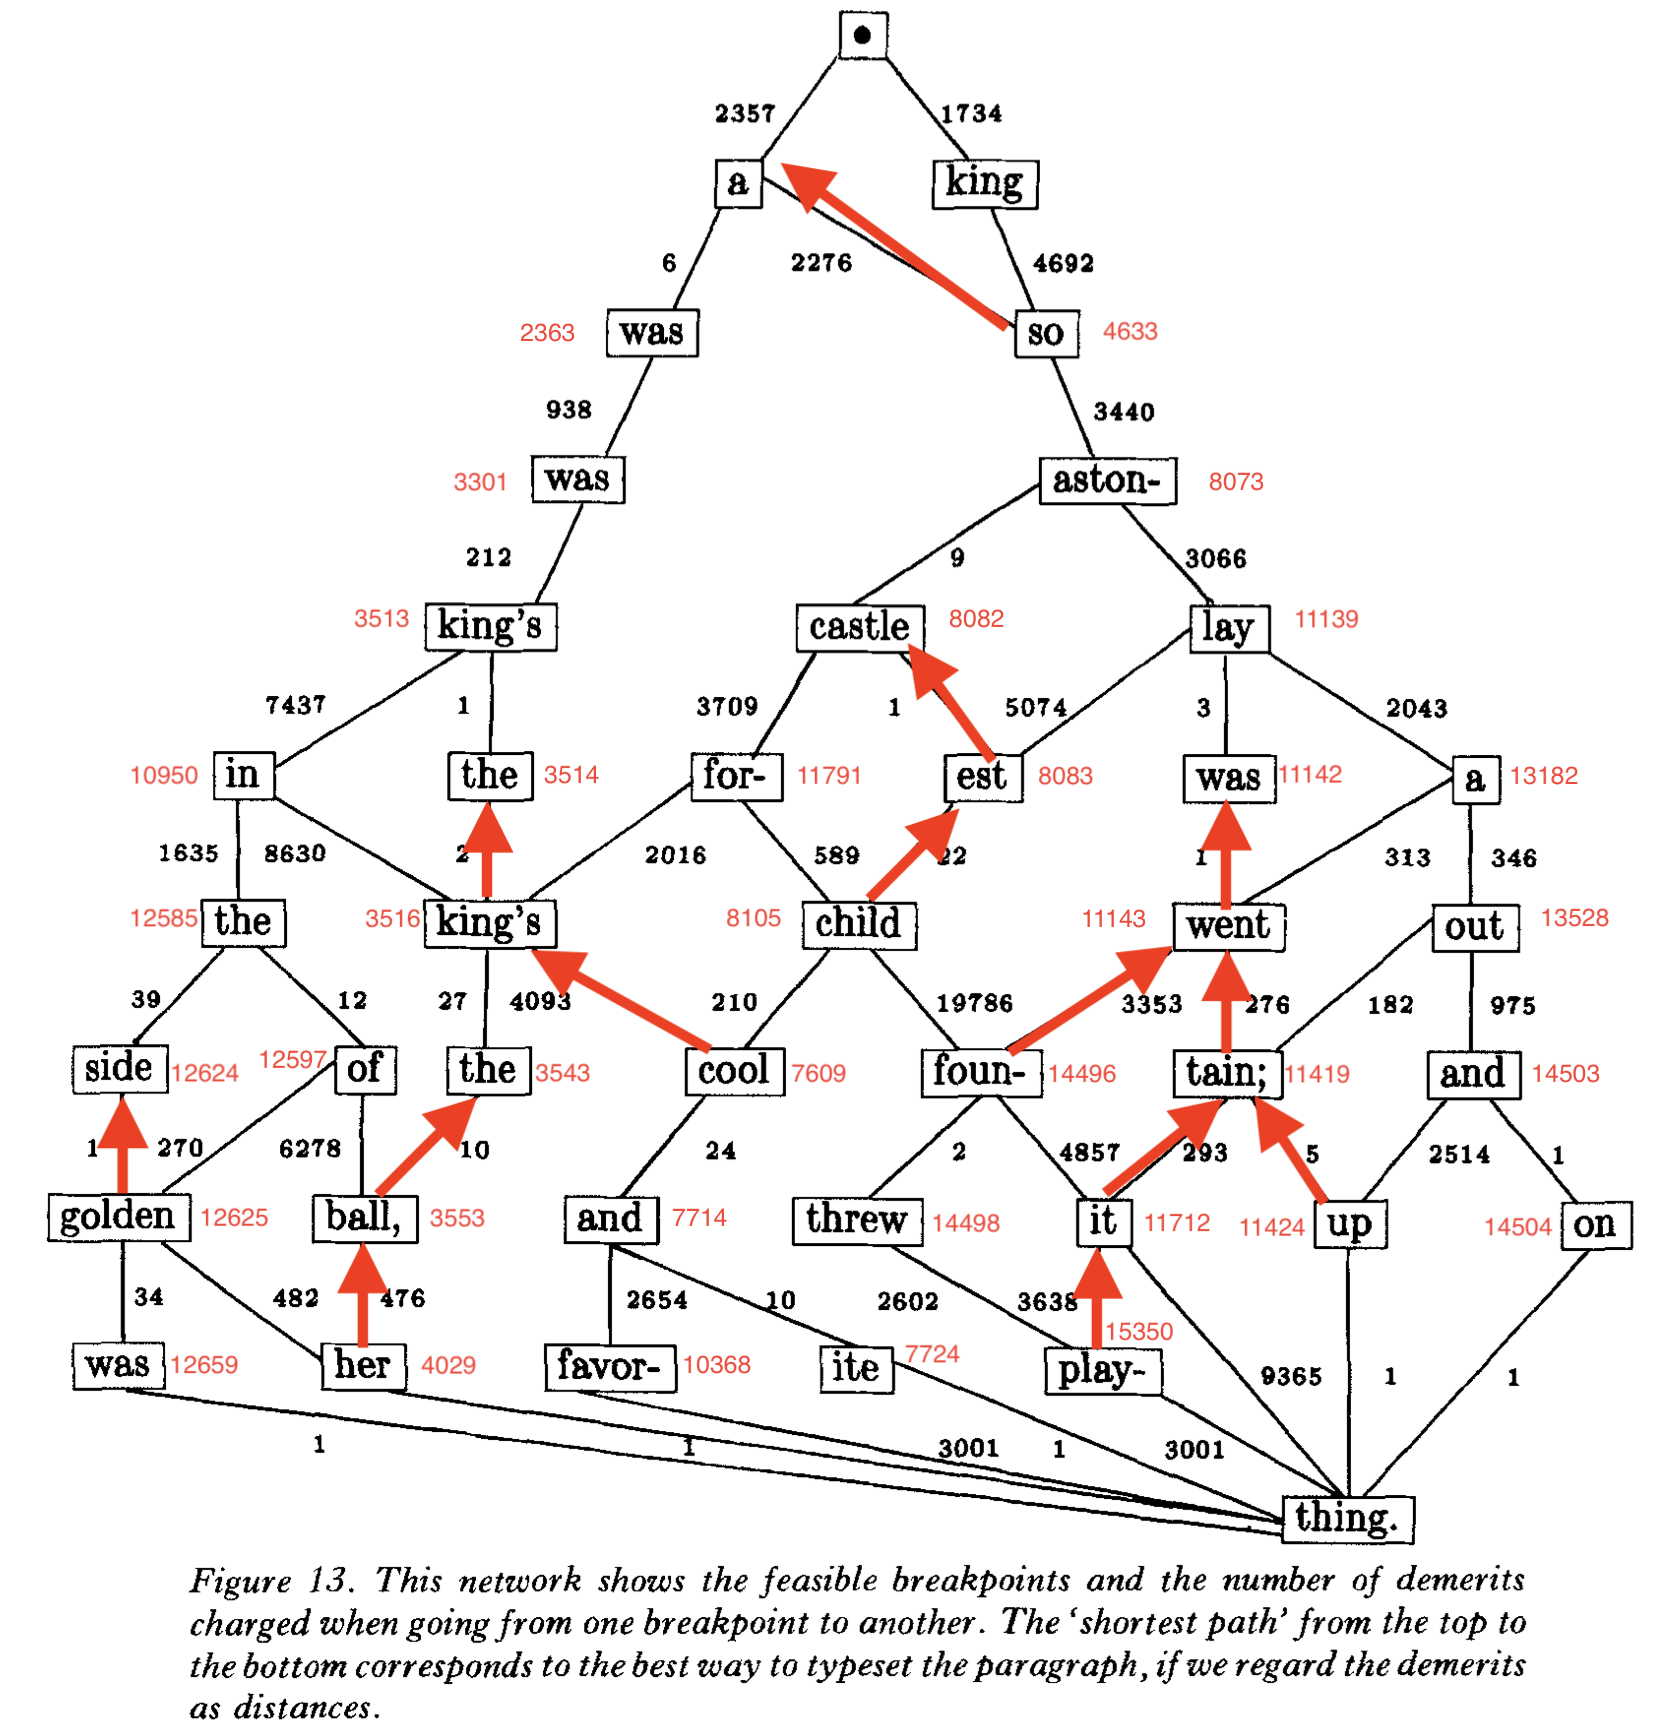
I have been looking a the line breaking algorithm implemented in Typst. It follows the same basic algorithm we are talking about, but builds the underlying graph differently, but calls it a table rather than a graph, just to confuse non-CS folks. You can find the description and the code here. From what I understand, it assigns each breakpoint, starting from the first, the cost of setting the paragraph up to itself, but that calculation takes into account the previous breakpoints' recorded score. If you will allow me to refer again to the beautiful graph above, look at the breakpoint "so" in the third line, and what is above it. To simplify the reasoning a bit, let's assume only the breakpoints in the graph are valid, even tho the logic would be the same when you go over every breakpoint.
- Beginning to the first bp "a" has a cost of 2357.
- First bp "a" to second bp "king" has a cost of 2357 (cost of "a") plus whatever the cost of "a" to "king" is. We find that Beginning to second bp "king" has a cost of 1734, which is less than 2357 + x, so we record that "king" has a cost of 1734.
- Third bp "was" goes through the same logic with every previous breakpoint, and the graph artist already found out the lowest cost "was" can have is 2363 (2357 + 6), we record that for "was" noting that we are basing this off of "a".
- Fourth bp "so" , when connecting with "a" has a cost of 4633 (2276 + 2357). When connecting with "king" it is 6426 (4692 + 1734). So we record that for "so" the least value we found was 4633 while connecting through "a".
- etc for each following one.
By recording the least value each breakpoint has, by the time you reach the last breakpoint, you already have the lowest cost path calculated for you with the lists of breakpoints you should, well, break at. I annotated this logic on the graph above, showing the cost of each breakpoint and highlighting the parent relationship that gave me the lowest cost (when there are multiple parents).. The path from the last breakpoint (at "thing") that gives "thing" the lowest cost is left as an exercise to the reader. To know the cost of each path, add the path's cost to the parent node's cost, and pick the path that gives you the least cost.

I find my version above easier to grok, to be honest. Either way you organize the code, you are building a graph, and then you are traversing it to find the shortest path. The main difference is where the cost is encoded. In my version, the cost is encoded in the edges themselves, where each edge carries its cost. In the Typst version, the cost is encoded on each breakpoint, by finding the smallest cost among parent nodes and their incoming edges.
What about build_line() ?
You will have noticed by now that I made no mention of boxes and glue in the code snippet above. This is because, in that model, they are the domain of the build_line() function.
// Function signature

fn build_line(input: ShapedText,
              start_breakpoint: u64,
              end_breakpoint: u64,
              desired_linewidth: f64) -> Result<Line, Error>;
How this function should work can be summarised as:
- Take the input processed and shaped text.
- Take a slice out of it. You know have an array (or vector) of glyphs, each has a specific width.
- Mark which glyphs are glue. (i.e. mark the spaces).
- Find the sum of all the boxes' widths. And find the number of the glue characters.
- Calculate the sum of all boxes and glue widths, with the glue at the maximum width per space character. If it is less than the desired width return an
Error::LineTooLoose. - Repeat with the glue at the minimum width per space character. If it more than the desired width return an
Error::LineTooTight. - Now do it with the glue at the ideal (font given) width per space character. This width, and its difference from the given line width (in the function input) is what is used to calculate the line's
cost. - Simple arithmetic should tell what the glue size for this line is.
Pseudocode
Here is again the pseudorustcode of our function.
fn build_line(input: ShapedText,
              start_bp: u64,
              end_bp: u64,
              desired_width: f64) -> Result<Line, Error> {

    // trims the glue at the beginning and end.
    let b_and_g = input.slice_betweeen(start_bp, end_bp);

    let sum_boxes = b_and_g.filter(|g| !g.is_whitespace())
                           .map(|g| g.horizontal_advance())
                           .sum();

    let count_glue = b_and_g.filter(|g| g.is_whitespace())
                            .count();

    // bear with me here
    let pft_space = input.ideal_space_width();
    let min_space = input.min_space_width();
    let max_space = input.max_space_width();

    if sum_boxes + (count_glue * max_space) < desired_width {
        return Error::LineTooLoose;
    }
    if sum_boxes + (count_glue * min_space) > desired_width {
        return Error::LineTooTight;
    }

    let true_width = sum_boxes + (count_glue * pft_space);

    // someone doublecheck this next line please
    let actual_space_width =
        (desired_width - true_width)/count_glue + pft_space;

    // raw cost, before changes for hyphenation and the like
    let line_cost = Math::square(desired_width - true_width);

    //...
    // Here is where you place a bunch of code laying out the
    // glyphs (sorry boxes) into a Line object, with the
    // actual_space_width you found, and return it!
    //...

    return Ok(final_line);
}
I hope you enjoyed this read and that you found it educational. In the next post I will write how the build_line() function can be adapted for non-Latin scripts (namely Arabic because that's all I know).
Edit on 12-Apr-2023: Here is Part 2
